From the start one thing was certain, I didn’t want a show car, but a GT to drive on a daily basis. Even if you had to do some modification more reliable and trouble-free technology should be integrated. The
2-liter The 2 liter FI engines rev up quickly on the highway in
the GT. With the one look at the tachometer I was frightened to see the
effects of 6200 revs/minute on the effort and the expenses of an engine
change. These sound effects
with can be endured only with a grim expression over a long period of
time. For sure the engine could have been revved even higher.
I also would like to drive faster, but anyone hearing the
tack-tack-tack announcing a failure of the rod bearings, can live
without it for the next 2 or 3 years.
Speeds beyond 180 km/hs (110 mph) are a bit nerve-racking and should
only be endured for a short time. But you can live with a reasonable
noise level and engine rpm’s at 160 to 170kph (100-105mph.
Practically it looked different. I ignored the
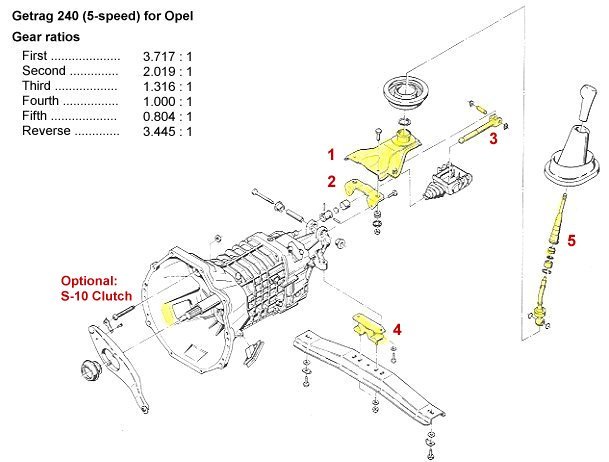
original optional Opel/ZF-transmission because of its high noise level.
I concentrated my search on one, the Getrag 240, with the fifth gear
.803 final drive ratio. Like many of you know, it’s not easy to find
this type. After some searching, I was lucky to buy a Getrag
240 from a Record E with 47,000 km (29,000 miles) for 700, - DM.($325
USD). The tranny looked rather huge, like it wouldn’t fit in the GT
transmission tunnel.
I did some research and concluded that, without
question, the gearshift extension would have to be shortened.
Additionally, I would have to bend the gearshift to fit exactly. I built
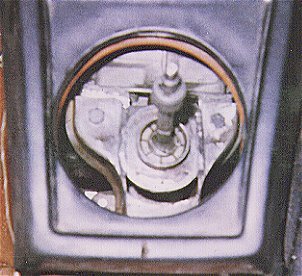
a mock-up of the original to test fit. See Fig. 1 I built a wooden plate and inserted 4 dowels to
mate to the bellhousing. The pivot point of the shifter plate is also
simulated with plywood and dowels.
Abb.2. A piece
of cardboard is also used to estimate the location of the shifter while
in the neutral position of the shift pattern. (fig.) 3). In addition, it
establishes the length of the travel for the 5-speed mechanism.
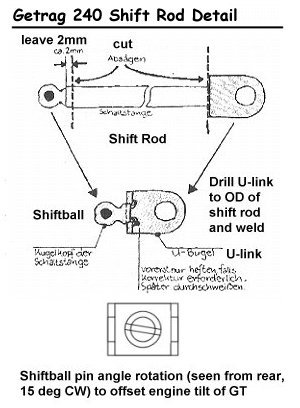
The Getrag mechanism 5-speed mechanism is different from the
original 4-speed shifter principle. It only has one cross-connecting
link, that leads from the front to the back of the body of the mechanism.
The gearshift lever is attached to the shift plate with a ball-joint and
connected with the shift linkage. This construction already leaves the
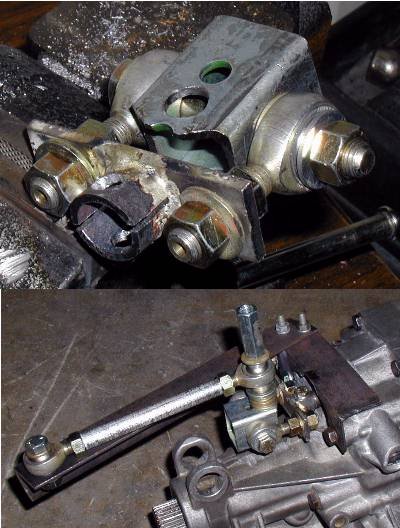
possibility of a precise shift pattern suspect. The rebuilt mechanism is in Figure 1.
Step 1 Step 2
Step 3 Step 4 Step 5
Step 6 Step 7
Step 8 Part II: Installation of the Transmission
Installing the gearbox
Now with a bit of serious thought:
Instead of the big extension you can also use three short extensions
together. Loosening of the bolts on the bottom is easy. After the
transmission is bolted on, the motor is easily lifted in front using a
jack with wood inserted to prevent damage to the oil pump cover. The pump is exposed and can easily be damaged. At this point
the engine is at a steep angle, and care should be taken not to strike
other parts of the engine compartment.
With injection engines the cold start-valve at the suction tube area is
a tight fit. Therefore, a helper must watch that the cold - start-valve
doesn’t hit the windshield wiper posts. With a carburated motor the Before
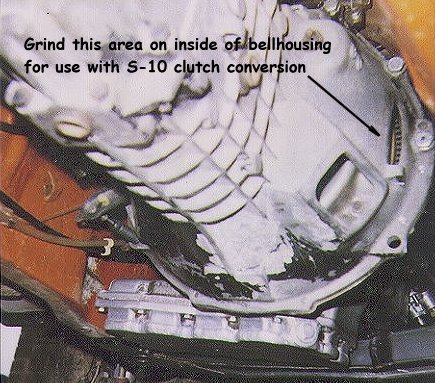
bolting the Getrag in place, you must install the original 4-speed
clutch release arm. The lever is identical, except in the mounting of
the clutch cable, the GT has a ball-piece, the Getrag, a threaded screw
and ball. An alternative is to swap the clutch cable. Then, the
comfortable adjusts slips however - possibility the clutch above in the
motor - area.
Now you can start to fit in the Getrag. With some feeling and something
That works out jerk-in straight away. The completed gearshift-assembly (hold-angles
" B ") see part l, remains dismantled during installation.
After the installation of the transmission complete the installation of
the shift linkage. Now,
check the position of the shift pattern in the vehicle.
If it is incorrect it can be repositioned and corrected, see Part
l.
The wires for the reverse light switch must be extended, since switch on
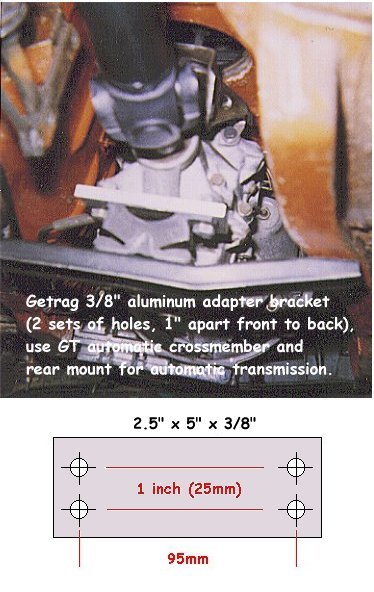
the other side of the transmission. Also the transmission cross-member
on the Getrag 240 sits 9 cm further to the rear than the original
cross-member. The rear transmission mount must be used from the Getrag,
This sheet metal strip was installed after being cut, bent in to a
vee-eight re-welded. When this cross-member was ready, it still appeared
the mechanism sat too low. Therefore, I put another 8 mm thick
aluminum-block between the cross-member and rubber. If not done, the
drive shaft would bend at too severe an angle. You can control the
height of the transmission based on a comparison measurement from the
stock-GT. Remove
material from the sheet metal edge of the gearshift hole Remove material until on the driving shaft with the
Original-GT approximately 120 mm, beim Five-speed approximately 117 mm,
tail-piece on the drive shaft has a larger diameter. The bolt-up of the
Getrag connection of the transmission cross-member takes place in the
holes for the for the automatic transmissions. Fig.,
The tail-shaft of the 5-speed transmission is larger at the rear than
the original manual transmission. It closely matches the Opel automatic
transmission tail-shaft. Unfortunately, the GT’s available automatic
transmission drive shaft doesn’t fit either.
It’s to short for the Getrag. Therefore, the Automatic drive
shaft must be lengthen and the flange mated for a U-joint. At a salvage
yard a drive shaft from an Ascona (1900) cost 30-40 DM ($12-15 USD). This
drive shaft must be properly shortened to the correct length and
re-welded. Here, do-it-yourself is absolutely prohibited. You can
improperly weld the seam and structurally alter the material that may
ultimately lead to failure of the drive shaft. For safety reasons, the
re-welds must be thoroughly inspected for hairline cracks.
Also the balancing can only be done on specialized equipment.
Balancing is no problem, if he has a fitting for an Opel drive shaft.
If this service is not available, you could go to one of the GT mail
order suppliers. There you get a drive shaft that has already been
shortened and re-balanced. Prices range from 200-300,-DM ($90-140 USD),
time of delivery approximately 2-3 weeks, they also do also do custom
orders. The use of the
automatic transmission drive shaft is somewhat less expensive. Speedometer-adjustment The
connection of the speedometer cable to the 5-speed transmission is no
problem, only the speedometer will register 40 km/h (25 mph) too slow.
This can be remedied by calling the VDO Factory. The branch office in
Hanover has been very cooperative and friendly in the past. Since
one something similar, particularly as GT-drivers, not at all more know,
I like to mention it. A test of relationship between the numbers of
rotation and the distance the whells rollof thethe rolling lenght
brollversuch first became through - led, i.e., a marked route became
departed and with help an on them/her/it Speedometer-wave of pretentious
gauge the register was determined. The register indicates the number of
turns the speedometer gear must make to register one kilometer. With my
car with 205/60 tires, original 3.44 rear axle and the 5-speed with a
blue pinion in the speedometer. The
register was W = 685. VDO can re-calibrate a speedometer, in principle
however, not this speedometer. That leaves for this reason Legislators
only one deviation of 4% Speedometers
- The
speedometer mechanism should not be lubricated by any means. It is already permanently lubricated, despite the fact that
it has a provision for lubrication. An excessive amount of lubricant on
the mechanism will completely ruin it.
|